Sealcoating Your Asphalt Driveway
The asphalt surface of a driveway or parking lot can take quite a beating over the years. Taking good care of the pavement through regular seal coating can help keep it in excellent condition.
The best time to sealcoat is in the fall. It requires temperatures above 50 and a minimum of 24 hours without rain for the application to be successful. Visit Website to learn more.
First, it’s important to understand that sealcoating requires the right conditions in order to be successful. It should be applied only when the pavement is completely dry, and any sprinklers must be turned off before application and for 24 hours afterward. If rain is in the forecast, the project should be postponed until the weather clears up.
Next, the pavement must be thoroughly cleaned because any dirt or mud will prevent the new coat from adhering to the asphalt. Any paint or coating used to mark lanes for traffic or parking spaces should also be removed. This can be a time-consuming job, but it is essential in order to achieve a smooth and quality finish for the sealcoat. A professional contractor will use special cleaning equipment that can remove even the most stubborn coatings.
The surface of the pavement should then be brushed with a special brush to ensure that it is completely clean and free of debris and dirt. This will help the sealcoat adhere properly and will ensure that any cracks are filled and not open to allow more moisture into the underlying pavement. Any weeds growing through the cracks should be pulled and, if possible, the cracks should be filled with hot rubberized crack filler that can expand and contract in tandem with the pavement in order to keep it stable.
Once the surface has been cleaned and any repairs made, it should be allowed to dry completely. This will usually take several days, and it is important that the area be closed off to vehicular traffic during this time. A good contractor will have signs posted that vehicles are not permitted to be on the pavement during this process, and they may also use cones and barricades to prevent people from entering or leaving the area while the sealcoat is drying.
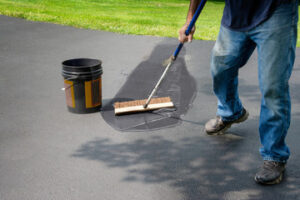
The next step is to apply the sealcoat. This is done using a spraying system that can cover large areas quickly. It is a chemical that contains petroleum-based material, and it is important that anyone handling it wears the appropriate protective clothing. This includes long-sleeved shirts, pants, impervious boots and gloves. It is also recommended that workers wear a mask to reduce exposure to the fumes.
Application
The application of sealcoat is a process that should only be done by professionals. Whether you are looking to have a large parking lot paved with asphalt or a small residential driveway, it is important that the job be completed correctly so that it lasts for many years and resists damage. A professional can help you choose the right sealcoating for your particular paving needs, and they will know how to prepare the surface before applying the coating.
The first step in the process is to block off the area that will be treated. This means that your commercial parking lot will be inaccessible for several hours while the sealcoating is being applied and drying. If you use your parking lot to load and unload inventory or facilitate deliveries, you should make alternative arrangements for these tasks during this time. Additionally, you should communicate with your customers and suppliers ahead of time that your parking lot will be inaccessible during the day of the sealcoating to ensure that they plan accordingly.
Once you have blocked off the area, it is time to clean the paved surface and repair any cracks. This should be done using a gas blower, degreaser, scrub brush, and water hose to remove any oil or chemical deposits that may have built up over time. If these materials are left to penetrate the surface, they will cause it to break down and degrade more quickly.
Before you apply the sealcoating, it is important to calculate how much material you will need for your project. You can use our blacktop and sealcoat calculator to do this by entering the width and length of the area you will be sealing and multiplying it by the number of square feet it covers. This will give you the total amount of sealer that you need.
Once you have the exact quantity that you need, it is important to mix the material correctly to achieve the desired results. The sealcoat should be mixed with water and sand in recommended proportions. If additives are added, they should be chosen at the manufacturer’s recommendations for compatibility. The mixture should be agitated to ensure that the ingredients are thoroughly dispersed and mixed evenly. The agitation also helps to reduce settling and dripping of the sealant.
Drying
Before the sealcoating can be completed, the surface needs to dry completely. This can take up to 48 hours, depending on the type of seal coat used and the weather conditions. During this time, it’s essential to keep people, pets and vehicles away from the area.
The first step is to block off the parking lot and turn off any sprinkler systems for nearby grassy areas. This will prevent the sealant from being sprayed onto anything other than asphalt. Workers should also wear rubber gloves and wear a mask to protect themselves from the harmful fumes that can be released during the drying process.
Next, the surface should be power washed and treated with crack filler if necessary to ensure that it is properly prepared for the seal coating. Workers should also remove any oil stains that are visible on the surface of the pavement. This will make sure that the asphalt is clean and dry, which will help it bond well with the new sealant.
Finally, workers should stage the barrels of sealcoat in the appropriate location. Each barrel is designed to cover a certain amount of square footage, so it’s important that they are placed at the right intervals. This will make it easier for the workers to spread the sealant evenly. Finally, workers should read the material safety data sheets for the sealcoating they are using and follow all instructions carefully.
Coal tar is one of the main ingredients in most commercial grade seal coats, and it can cause skin irritation if not handled properly. This can be exacerbated by hot humid days, which makes it important for workers to wear protective clothing and equipment.
A layer of sealcoat can help extend the lifespan of an asphalt paved surface by protecting it from oil, fuel and chemical substances that can degrade the asphalt. It can also save money in the long run by reducing the need for full asphalt replacement.
While sealcoating can be a tedious and time-consuming project, it’s important for the longevity of an asphalt pavement. By following the steps outlined in this guide, you can ensure that your driveway or commercial parking lot lasts for as long as possible and looks brand new for years to come.
Maintenance
Asphalt pavement is a costly investment, and it’s important to protect your investment by maintaining the appearance of the surface. Regular sealcoating will help to extend the life of your asphalt and save you thousands in repair costs in the long run. Sealcoating is also a great way to enhance the curb appeal of your property and add value to your home or business.
The first step in the process is to block off the designated area for sealcoating. This will prevent traffic from damaging the newly applied coat and also keep any unauthorized people out of the work area while it is drying. If you have a sprinkler system that waters the grass surrounding your parking lot, it should be turned off prior to the start of the process and left off for at least 24 hours afterward to allow the sealcoating time to dry completely.
It’s recommended to have your driveway sealcoated every two to three years, depending on the amount of use it gets. Waiting too long can cause water to seep into cracks and fissures in the asphalt, and this will shorten its lifespan. It’s worth the minor labor involved in applying the sealcoat to extend the life of your driveway and make it look brand-new again.
There are several steps that you can take to prepare your driveway for a sealcoating, including washing it, priming it, and repairing any visible cracks or holes. Washing the driveway will remove oil stains and other contaminants, which will help to improve its ability to absorb the new sealcoat. Priming the driveway will make sure that the sealant will adhere to it and not peel off later on. Lastly, fixing any cracks or holes in the pavement before sealcoating will ensure that it looks its best when completed.
If you decide to have your driveway sealcoated, it’s important to find a reliable contractor with experience in residential and commercial projects. It’s also a good idea to request references and a detailed, itemized estimate for the project before hiring someone. Some contractors may try to cut corners by skimping on materials or labor, which will cost you more in the long run.