Why Roof Repair Is Worth the Time and Effort
A good roof repair job takes a great deal of skill. It also involves a lot of time and effort. But it’s worth it if you take the time to do it right.
Check for cracked housings on plastic roof vents and broken seams on metal ones. You might be able to throw caulk at these problems, but it won’t last long. Visit https://www.bostonroofingco.com/ to learn more.
Roofing shingles are among the most visible aspects of your roof, and they’re also one of the most susceptible to damage. The combination of strong winds, heavy hail and snow, sun exposure and critter scurrying across the roof can lead to shingle wear and tear over time. If not promptly repaired, these damaged shingles can allow water to leak into your home and cause further problems.
Replacing a single shingle requires a few basic tools and materials that most homeowners have on hand. Before you do anything, though, make sure to carefully climb up onto the roof and inspect it for shingle damage. Look for visual clues like missing shingles, as well as any water stains on the ceiling and walls.
Once you’ve identified the location of the damaged shingle, you can start working on a repair. Start by seeing if you have any leftover shingles from the last time you worked on your roof (with any luck, the builder or roofer will have left some behind). If not, you can pick up a bundle at a home center or lumberyard. Choose a shingle that is as close to a pattern match as possible to the ones already on your roof.
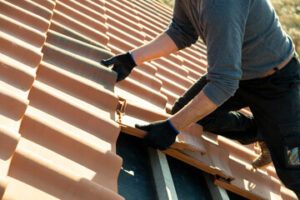
Next, locate the nails that hold the shingle in place. Typically, a shingle is secured with four nails, and those nails pass through the shingle course above it and into the roof deck below. To free these nails, slide a flat pry bar gently under the shingle to separate it from the roof surface. This process is easiest in cool weather, when the sealant on the shingle will be more easily sheared off by the pry bar.
Once the shingle is removed, loosen the remaining nails and remove them. You may need to loosen other shingles in the area to expose the nails that are still holding them in place. Be sure to secure these other shingles while you’re at it to prevent further moisture intrusion.
After the old shingle is completely removed and the nails are loose, apply some roof sealant to the roof deck where the missing shingle used to be. You can also use this opportunity to apply some to any other cracks or gaps in your roof. The shingle sealant can help protect your roof from moisture and a variety of other environmental hazards.
Flashing
Many elements of roof construction go unnoticed, but flashing is one of the most critical. It prevents water leaks in vulnerable areas such as corners, valleys, chimneys, vents and skylights. It also protects the edges of roof structures like dormers and eaves from weather damage, and guards against ice damming in cold climates.
When flashing is damaged or leaking, it’s important to find the source and fix it quickly. Even a small leak can lead to mold, rotted framing and sheathing, and destroyed insulation over time. It’s a good idea to inspect your roof flashing regularly, especially around chimneys, vents and skylights, to make sure that it’s in good condition.
Flashing is a thin, metal material that seals and protects areas where roof surfaces meet. It’s typically made from steel or copper, although other materials are sometimes used as well. It’s often installed along edges and joints on the roof, as well as the sides of dormers, eaves, ridges and valleys. Flashing is typically built to last, but it can become damaged due to weather or age. If it’s not repaired promptly, it can cause expensive roof repairs later on.
Depending on the severity of the damage, it’s possible that roof flashing can be fixed with caulk or roofing cement, but these solutions are only temporary. A professional roofer is a better choice to repair the damage, and can also assess whether the flashing needs to be replaced entirely to ensure that it’s watertight.
A skilled roofer will be able to identify the source of the leak, and ensure that any further damage is not caused by the same issue. They’ll also know how to safely remove shingles, expose the flashing and repair it as necessary. This is a job that should only be done by experienced roofing contractors, who understand best practices and safety requirements for working on roofs. They’ll be able to identify warning signs of flashing damage that may not be obvious to the untrained eye, and address them before they turn into major roof repair problems down the line.
Gutters
Gutters are the unsung heroes of your roof. They protect your home from water damage by redirecting rainwater away from the foundation of your house and preventing soil erosion around the structure. They also help prevent rotting fascia boards and soffit. In addition, they help to reduce the risk of pest infestations by preventing stagnant water from collecting in areas where mosquitoes, termites and other insects breed.
A gutter (or eavestrough) is a pipe that runs along the eave edges of your roof to collect water and direct it toward a downspout or drain. Downspouts are vertical pipes that carry rainwater from the gutters and away from your home’s foundation and walls. Gutter systems can be either internal or external, and are attached to the soffit and fascia boards of your roof.
Ideally, your gutter system should be positioned so that it can handle the maximum amount of rainfall in your area without becoming clogged or overflowing. This is a factor that needs to be considered during your roofing project as addressing gutter issues later on in the life of your metal or other long-life roof can be difficult and expensive.
The key to keeping your gutters working properly is to ensure they are clear of all debris, including dirt, twigs, leaves and other organic matter. Clogged gutters prevent the smooth flow of rainwater away from your roof and can lead to the deterioration of the fascia board, soffit, and even the wall underneath. In addition, a clogged gutter can cause water to back up into the house and cause serious foundation problems.
Gutter cleaning is a simple and inexpensive task that should be done regularly to ensure your roof and home are protected. Putting off regular maintenance can result in expensive roof repairs and other costly damage to your foundation and walls. Preventative measures such as regular gutter inspections and cleaning can save you thousands of dollars in the long run.
Vents
Vents allow hot, stale air to escape from the attic so fresh air can flow into the house. This helps extend the life of shingles, reduces energy costs and can help to prevent mold and respiratory problems. However, if the ventilation system is clogged or doesn’t work properly, stale air can collect in the attic and circulate throughout the home. This can also damage insulation, cause stains on the ceiling and walls, or even affect your indoor temperature.
There are several different types of roof vents, and they can be found on almost every type of house. Some common examples are gable end vents, which are located on the ends of the eaves, and ridge vents, which are often seen on houses with flat or shallow shingled roofs. Vents can be installed as part of a new roof or added to an existing one.
The roofer will usually cut a small hole in the sheathing at the eaves and then install a vent pipe that’s capped with a metal flashing. A shingle is then bent over the top of the vent and nailed in place. A ridge vent is similar, except it’s typically made from a single piece of aluminum or a fiberglass material that’s rolled out over the ridge. A shingle cap is then placed over the ridge vent and nailed in place to prevent rain or snow from accumulating inside the vent.
Plumbing vents are another important type of roof vent. They’re commonly located near bathrooms and kitchens, and they vent warm moist air from the building’s interior through ductwork to the exterior. If the vents become damaged, leaking water may occur in these areas. When examining plumbing vents, look for cracked housings or broken seams. Also, check the nails that hold the base of the vent at the bottom edge for signs of pulling free or rusting. If they’re pulled free, replace them with rubber-washered screws, which can be found at any home center.